Who is this for? Students new to version control and Git/GitLab.
When to do this: Complete after Seminar 0a and before Seminar 1.
This notebook is structured concept-first: 0. Why version control?
What Git is
What a Git repository is
Local vs remote repositories
Core components (working directory, staging area, commit history)
Essential lifecycle commands
Daily workflow,
.gitignore, and practice
0) Why Do We Need Version Control?
Imagine you are working on a programming assignment. After hours of work, everything runs perfectly. Then you make a small change — and suddenly nothing works. You try to undo it, but you cannot remember exactly what you changed. You wish you had a snapshot of the working version from an hour ago.
Or picture this: you and a classmate are both editing the same file. You share it by email or a USB stick. Soon you lose track of who has the latest version, and when you try to combine your changes, one person’s work gets accidentally deleted.
Software version control (SVC) is a system that solves both of these problems. It:
keeps a complete history of every change, so you can always return to any earlier state
lets multiple people work on the same project without overwriting each other’s work
records exactly what changed, when, and who made the change
The most widely used tool for software version control today is Git.
1) What Is Git?
Git is a distributed version control system — meaning every developer has a full copy of the entire project history on their own machine. You can work completely offline, and there is no single server whose failure would cause data loss.
In practice, Git helps you:
track every meaningful change in your project
collaborate without overwriting each other’s work
recover earlier versions when something breaks
Git is used in personal projects, team projects, and open-source work.
GitLab is a hosting platform for Git repositories (online backup + collaboration).
2) What Is a Git Repository?
A Git repository is your project plus its complete change history.
Think of it as a project container that stores:
current files
snapshots of past states (commits)
metadata (who changed what, when)
A repository can live locally on your machine and remotely on GitLab at the same time.
3) Local vs Remote Repositories
Local repository
lives on your machine
you can
add,commit, inspect history, and work offline
Remote repository
hosted on a platform such as GitLab
used for backup and collaboration via
push/pull
You typically use both: local for daily coding, remote for sharing/syncing. The most common remote repository platforms are GitHub and GitLab.
Prerequisite: Install Git
Install Git from the official source:
https://
Verify installation:
git --versionShould return something like:
git version 2.50.1 (Apple Git-155)4) Core Components of a Repository
A Git repository has three key working areas:
| Component | Meaning | Typical command |
|---|---|---|
| Working directory | files you are actively editing | edit files |
| Staging area | selected changes for next snapshot | git add |
| Commit history | saved snapshots with messages | git commit |
While we cannot cover Git in its entirety in this course, you can find an excellent visualization by Sujan Adhikari below and I would strongly recommend visiting his Medium article:

5) Lifecycle Commands (Concise)
The minimal lifecycle commands:
git init-> create local repository metadatagit add-> stage selected changesgit commit-> save a snapshot with messagegit remote add origin <url>-> connect to remote repositorygit push -u origin main-> publish commitsgit pull-> sync latest remote changesgit clone <url>-> copy existing repository
Note: the -u flag in command 5 is only needed on the very first push. After that, git push on its own is sufficient — which is what the day-to-day workflow uses.
This is the backbone of your daily Git usage.
Canonical example: local repository
# go to project folder
cd ~/Documents/algorithmics   # macOS
# cd %USERPROFILE%\Documents\algorithmics   # Windows

# initialise local repo
git init

# create file, stage, commit
echo "# My algorithmics course" > README.md   # creates README.md containing that text
git add README.md
git commit -m "Initial commit: add README"

# inspect
git status
git log --oneline
Good commit messages are short, specific, and action-oriented.
Connect local -> remote (GitLab)
Create an empty repository on GitLab, then connect and push:
git remote add origin https://gitlab.unige.ch/your-username/algorithmics.git
git push -u origin main
origin is the conventional name for your main remote repository — you could use any name, but origin is the universal standard. The -u flag sets origin main as the default, so future git push and git pull commands need no extra arguments.
If prompted for a password, use a GitLab personal access token — not your regular account password. Token creation is covered step by step in the Setup section below.
After push, your commit history is now backed up and shareable on GitLab.
6) Day-to-Day Workflow
Use this loop every time you work:
git pull
git add <file>   # or git add .
git commit -m "Describe what changed and why"
git push
Replace <file> with the actual filename, e.g., git add helloworld.py. Use git add . to stage all changed files at once.
Useful checks:
git status        # see which files have changed or are staged
git diff          # see exactly what changed, line by line
git log --oneline # browse the commit history
Rule of thumb: commit small, meaningful units.
.gitignore for Python projects
Git should not track virtual environments, caches, sensitive data and OS junk files.
Create a new empty file named .gitignore in project root:
venv/
__pycache__/
*.pyc
.ipynb_checkpoints/
.pytest_cache/
.ruff_cache/
.DS_Store
Thumbs.db
Git reads this file to decide what to ignore. venv/ matches any folder named venv. *.pyc uses the * wildcard to match any file ending in .pyc. Everything listed here will never be included in your version control.
Commit it once:
git add .gitignore
git commit -m "Add .gitignore"
git push
If venv/ was already tracked, untrack it with:
git rm --cached -r venv/Clone an existing repository
git clone https://gitlab.unige.ch/username/repository-name.git
cd repository-name
Then set up Python environment for that project:
python3 -m venv venv
source venv/bin/activate    # macOS
# venv\Scripts\activate.bat # Windows CMD
pip install -r requirements.txt
Essential Git Commands — Quick Reference
| Command | What it does |
|---|---|
git init | Initialise a new local repository in the current folder |
git clone <url> | Clone a remote repository to your machine |
git status | Show which files have changed or are staged |
git add <file> | Stage a specific file for the next commit |
git add . | Stage all changed files (use carefully) |
git commit -m "msg" | Save a snapshot of staged changes with a message |
git push | Upload local commits to the remote repository |
git pull | Download and merge changes from the remote |
git log --oneline | Show compact commit history |
git diff | Show unstaged changes line by line |
git restore <file> | Discard unstaged changes in a file |
git remote -v | Show linked remote repositories |
Further Resources
You do not need advanced Git for this course; the workflow above is enough. If you want to go deeper:
Conceptual read (repository-focused): What is a Git repository?
Interactive branching visualiser: https://
learngitbranching .js .org GitHub Skills (guided courses): https://
skills .github .com Official Git docs: https://
git -scm .com /doc VS Code Source Control docs: https://
code .visualstudio .com /docs /sourcecontrol /overview
Setup for your Project Submission
In this part, you will create a new repository on GitLab, clone it to your computer (so you get a local folder), and connect both. The setup assumes no prior Git or VS Code knowledge; still, we strongly recommend that you read the rest of the notebook before you start.
Step 1: Create the repository on GitLab
Go to the University of Geneva’s GitLab page and create a GitLab account here. If you are having trouble doing so, please carefully read the UNIGE’s GitLab documentation here.
Now, access the GitLab Group for this course here. A GitLab Group is a shared space that organizes all student repositories for this course.
By default, you do not have access to the course. On the top right, click on the menu and “Request access”:

Note: The TA has to accept your request which can take up to two days to happen. You can only continue after your request was approved.
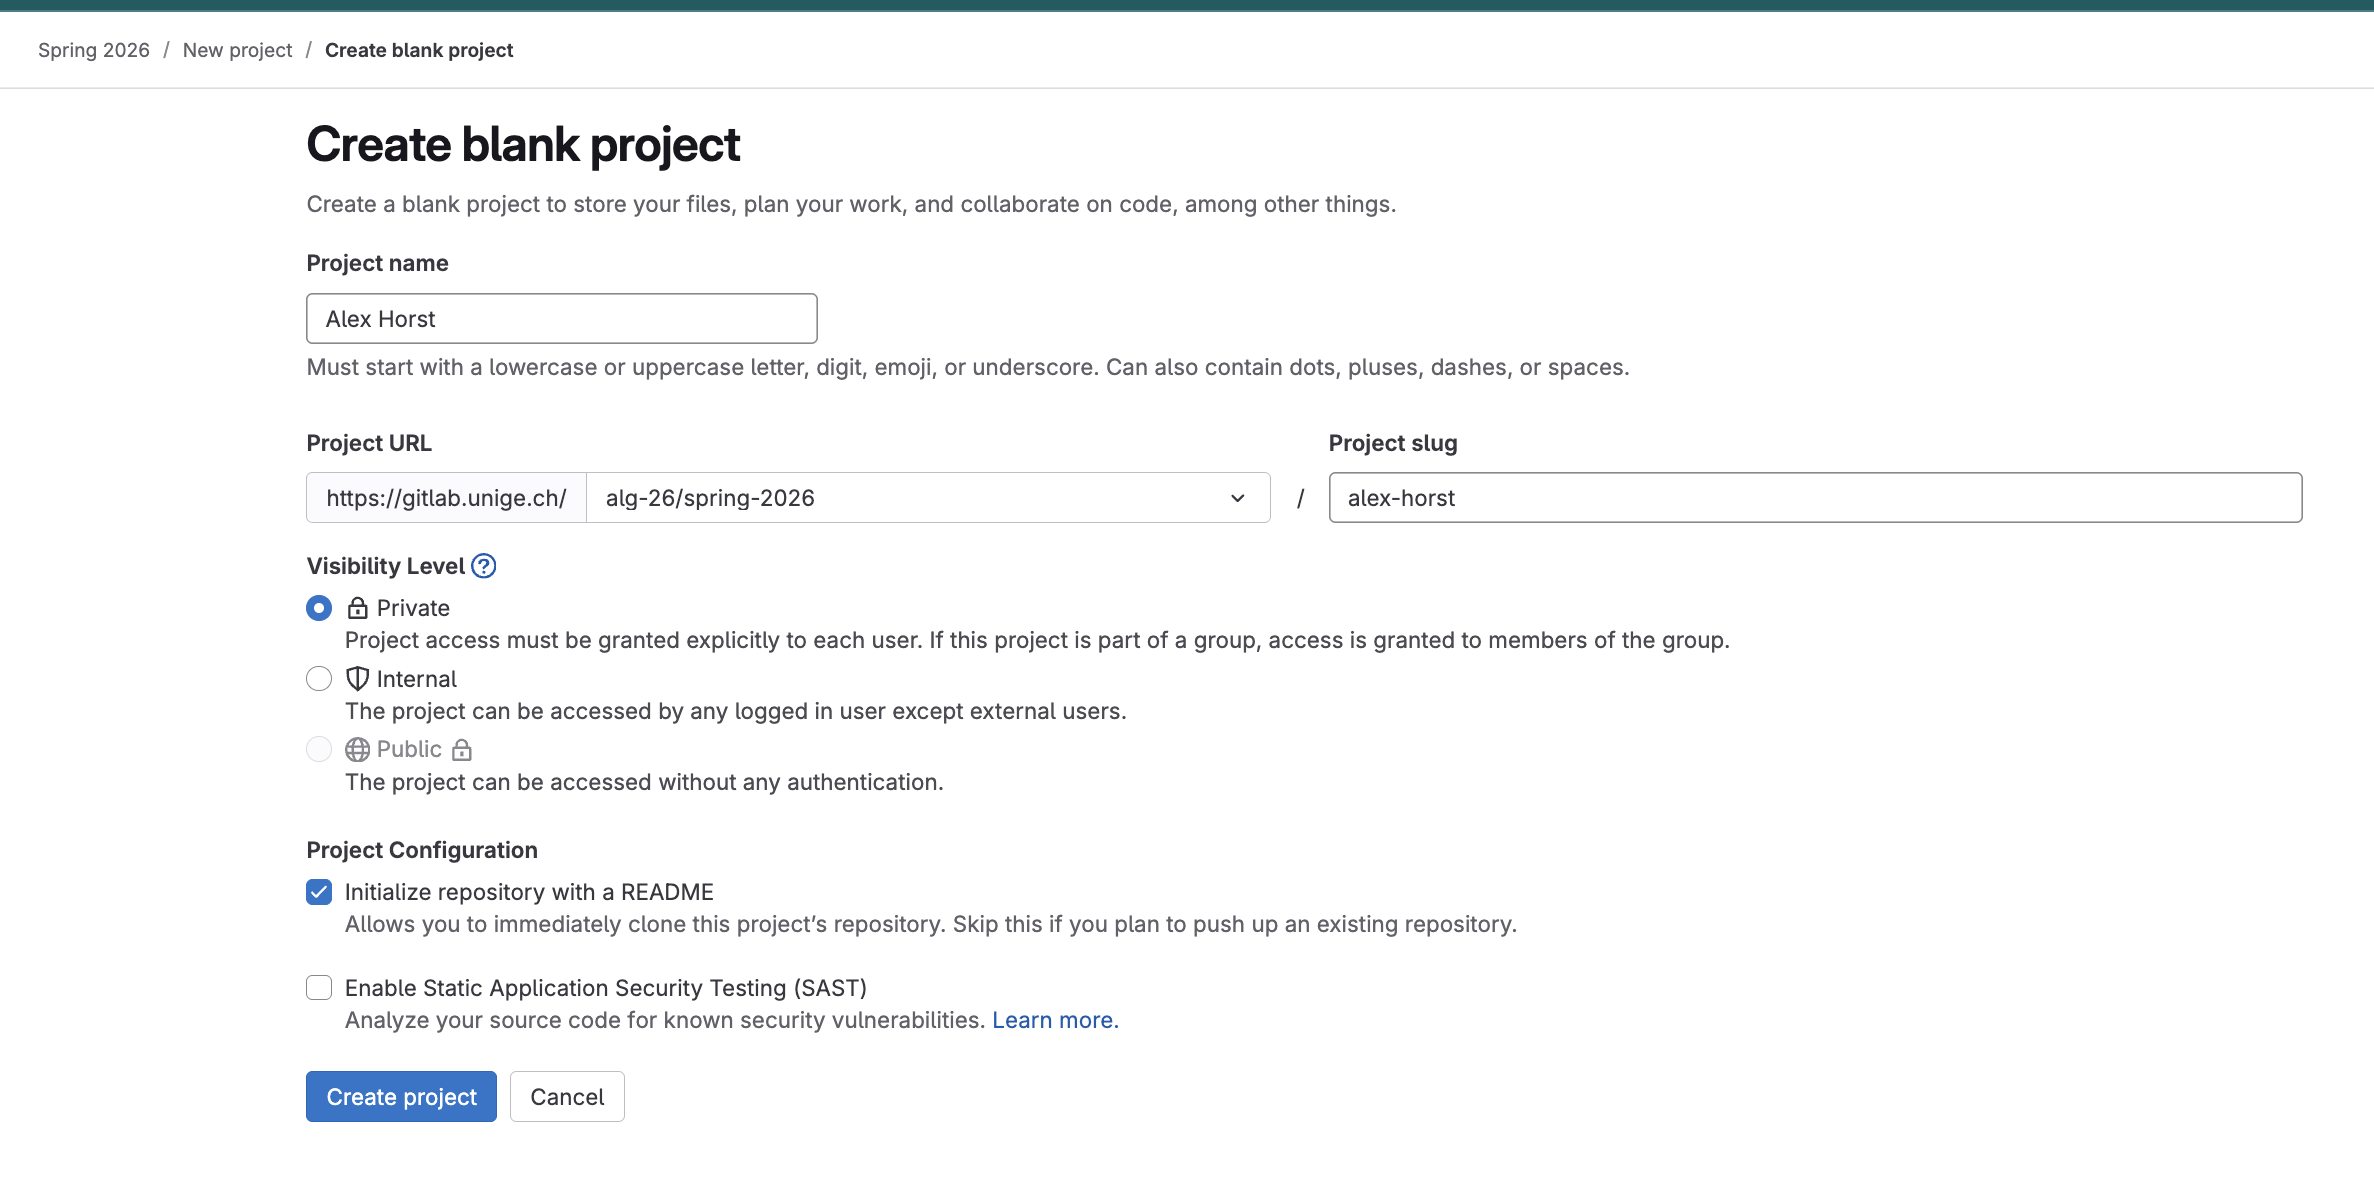
After your request is approved, open the course site and click “New Project” (top right). On the next screen, select “Blank Project”, enter your name in the format
firstname-lastname(e.g.,alex-horst) as the repository name, set its visibility toprivate, make sure the check box “Initialize repository with README” is set and click “Create project”:
Before you continue, you have to generate a GitLab token. You can think of the token as your Git password: whenever Git asks for a password, use this token instead of your regular account password. To generate a token, go to your GitLab settings > Personal access token (or directly GitLab settings). Press “Add new token” on the top right and select at least
read_repositoryandwrite_repository(as shown in the image below). Make sure the expiration date is after the end of the course; otherwise, you would need to create a new access token. Then click on “Create personal access token”.
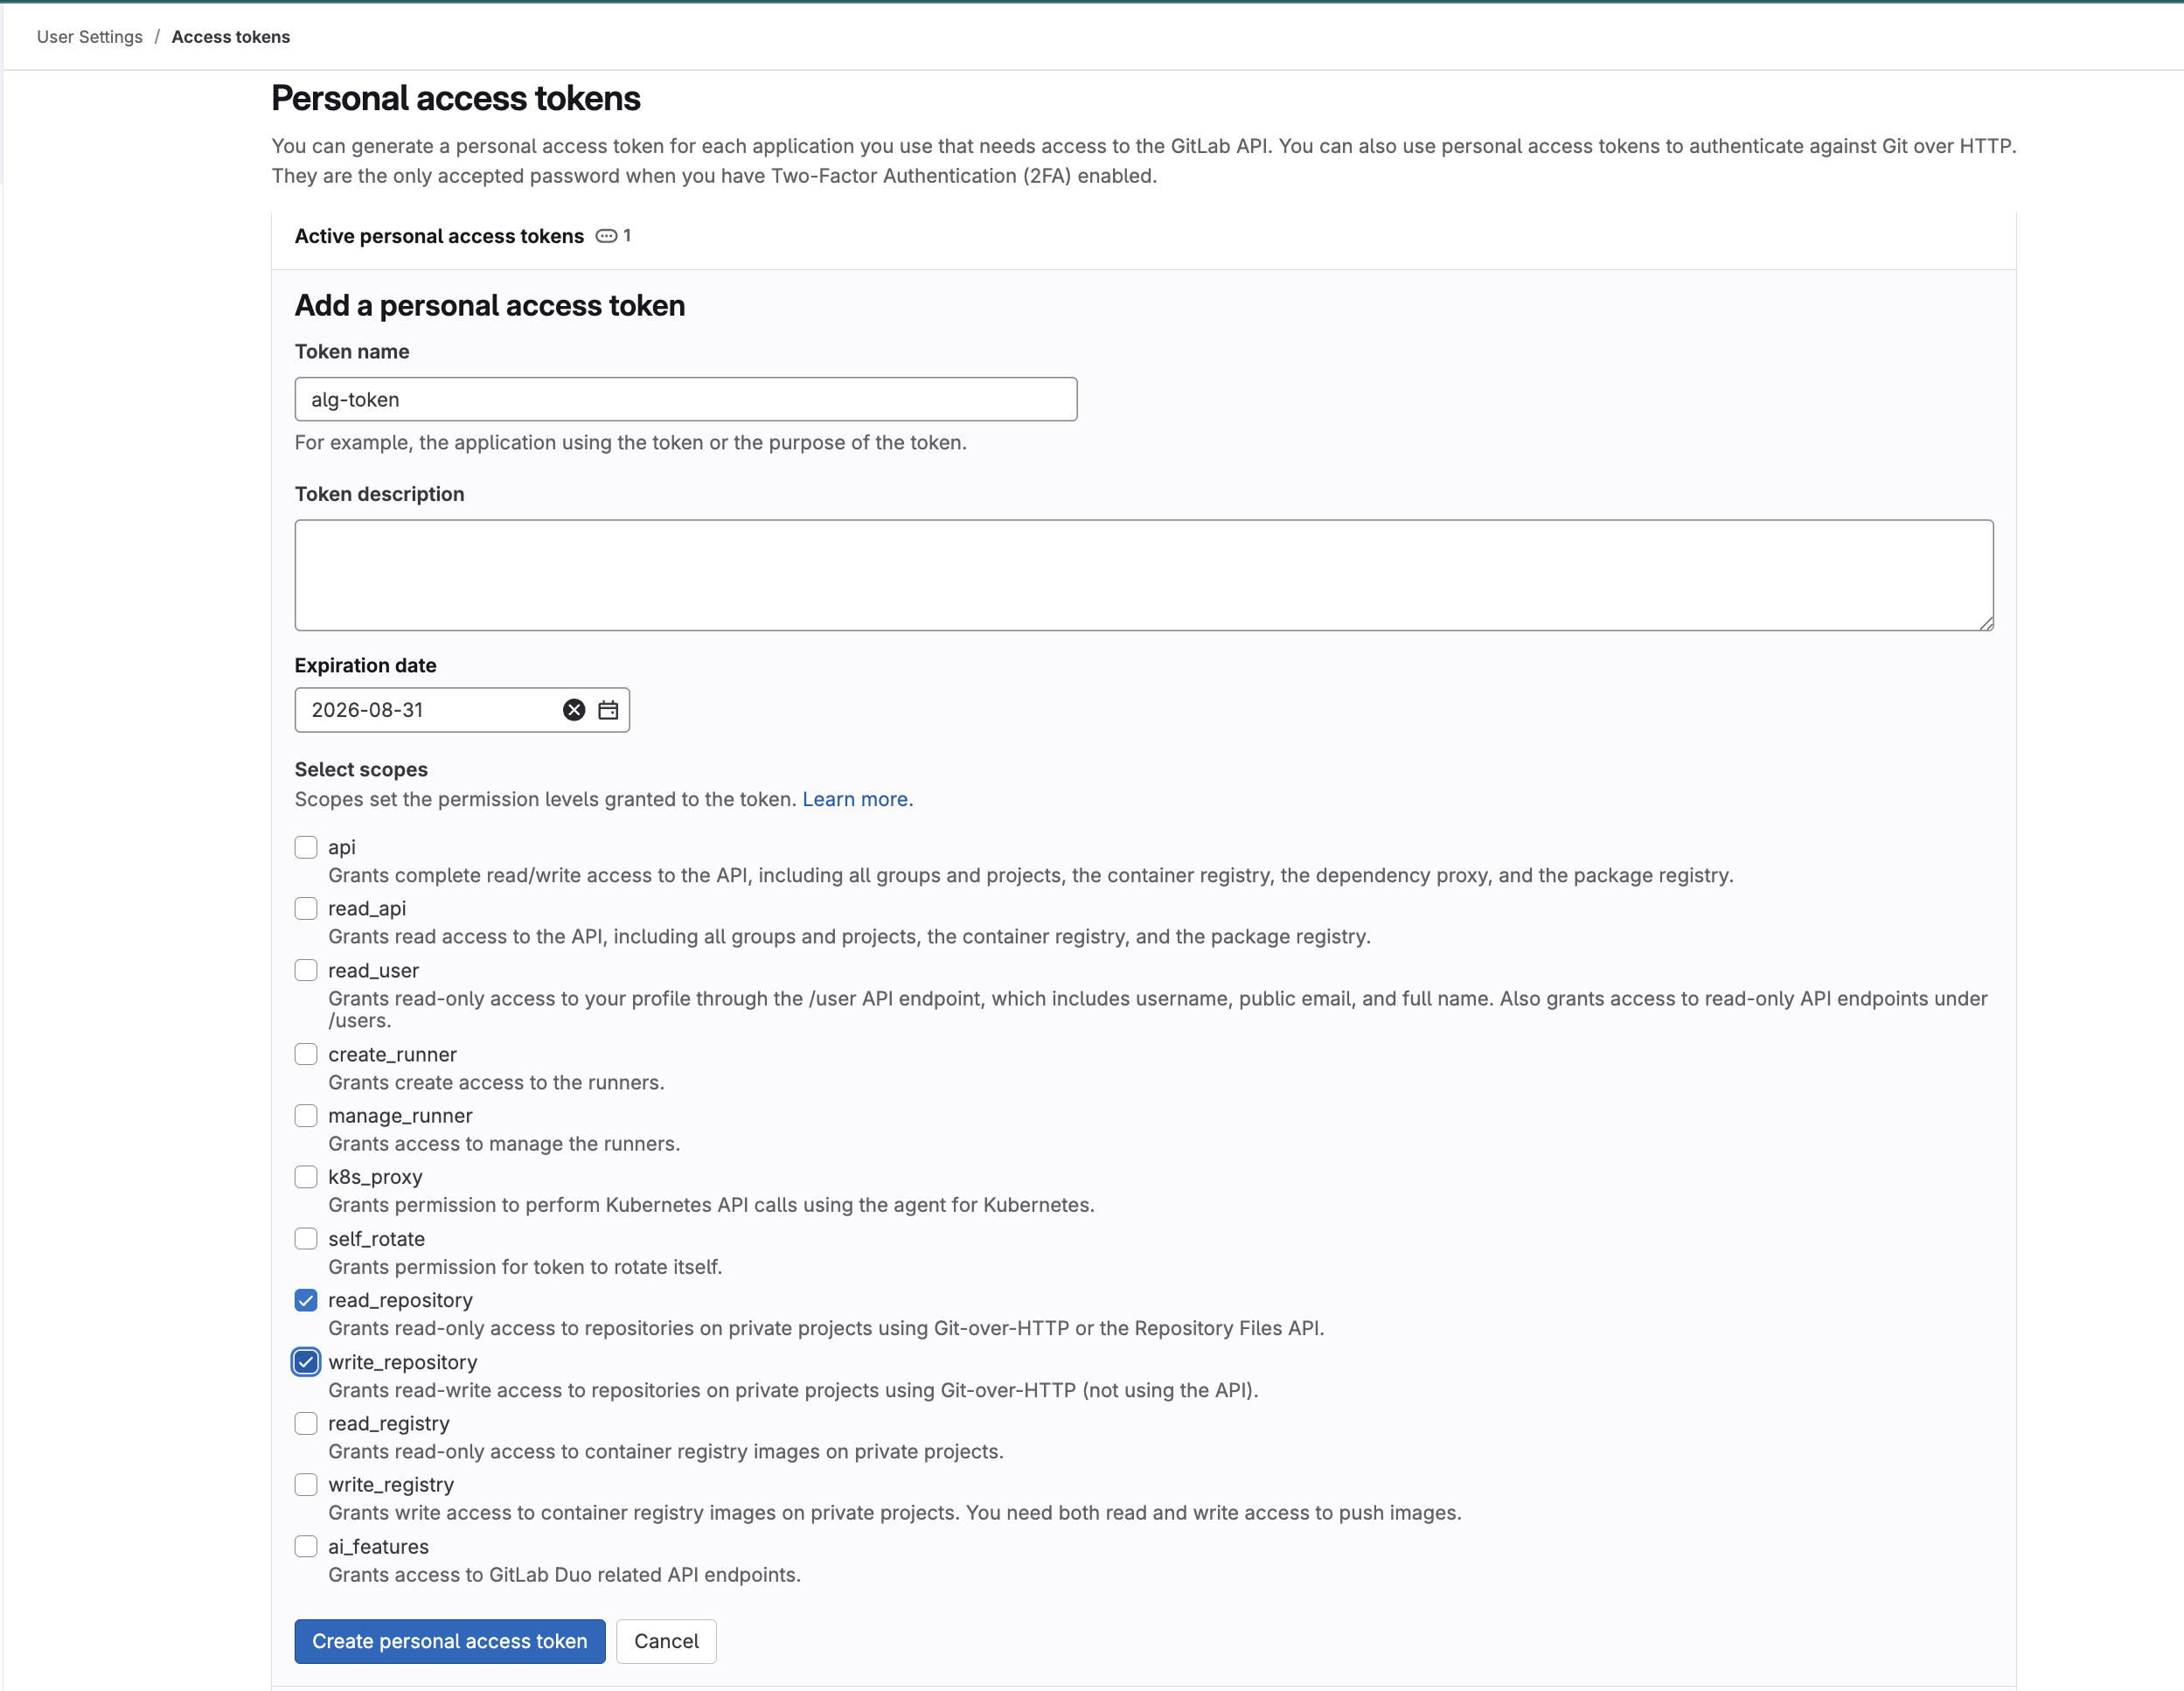
IMPORTANT: You can only see your access token once. Copy it immediately and store it safely. If you lose it, you will have to create a new one. Treat your token as confidential: it allows full read/write access to GitLab for your account. Never commit a token. If you store it in a file like .env, make sure .env is in .gitignore.
Step 2: Synchronize changes from your computer to the remote repository
Next we will link your local code to this remote repository. While there are several ways to do so, the easiest is the following:
On your machine open a terminal. On Windows, use Git Bash (installed alongside Git) — not CMD or PowerShell, as the commands below use bash syntax.
Now we have to tell git who you are. We can use the
--globaloption to specify this for ALL git projects on your machine (as opposed to just the current project). To do so, run the following commands:
git config --global user.name  "Your Full Name"
git config --global user.email "your.email@example.com"
You only need to do this once per machine.
3. Navigate to the “parent” directory where you want your code to be. So for example in ~/Documents (you can use the command cd to navigate in a terminal).
cd ~/Documents          # macOS/Linux
cd %USERPROFILE%/Documents  # Windows Git Bash
Type the following command (same for Mac, Linux and Windows):
# Template:
git clone https://gitlab.unige.ch/alg-26/spring-2026/<your-project-name>.git <your-project-name>
# Example (replace with your own project name):
git clone https://gitlab.unige.ch/alg-26/spring-2026/alex-horst.git alex-horst
git clonecopies a remote repository into a folder on your own machine. The URL tells git from which repository to take the code and the last parameter tells git in which folder to create the files. In the example, it would create a folder namedalex-horstand put the code into that folder. If you have not connected your machine with UNIGE’s GitLab before, your computer will ask you for a username (use your UNIGE’s e-mail address) and a password (use the token you have created in Step 1). This will be necessary only the first time. Your can type the following commands in your terminal (please note, that your terminal will look different, i.e. you will most likely not see git:(main)).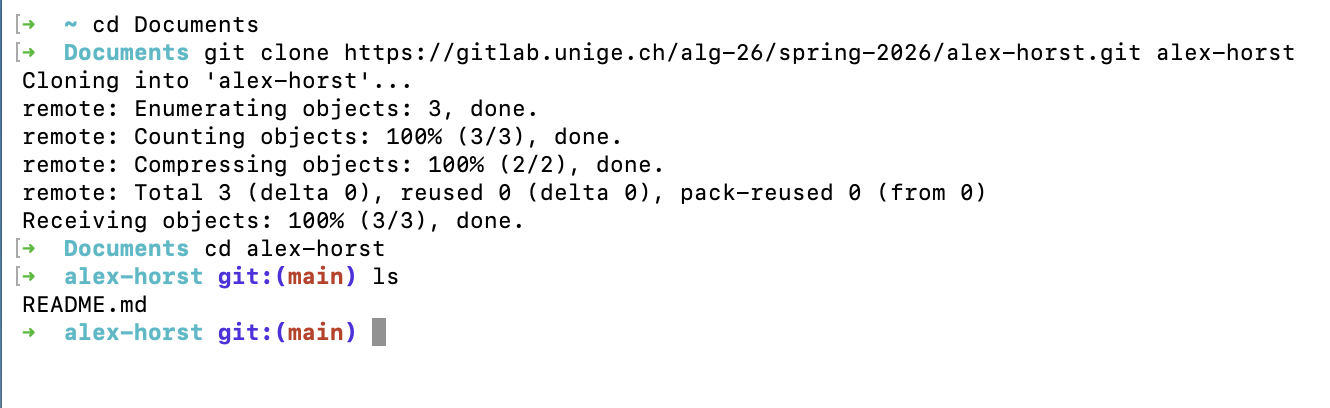
The terminal is no longer needed for now — open VS Code.
In VS Code, open the newly created folder (for example
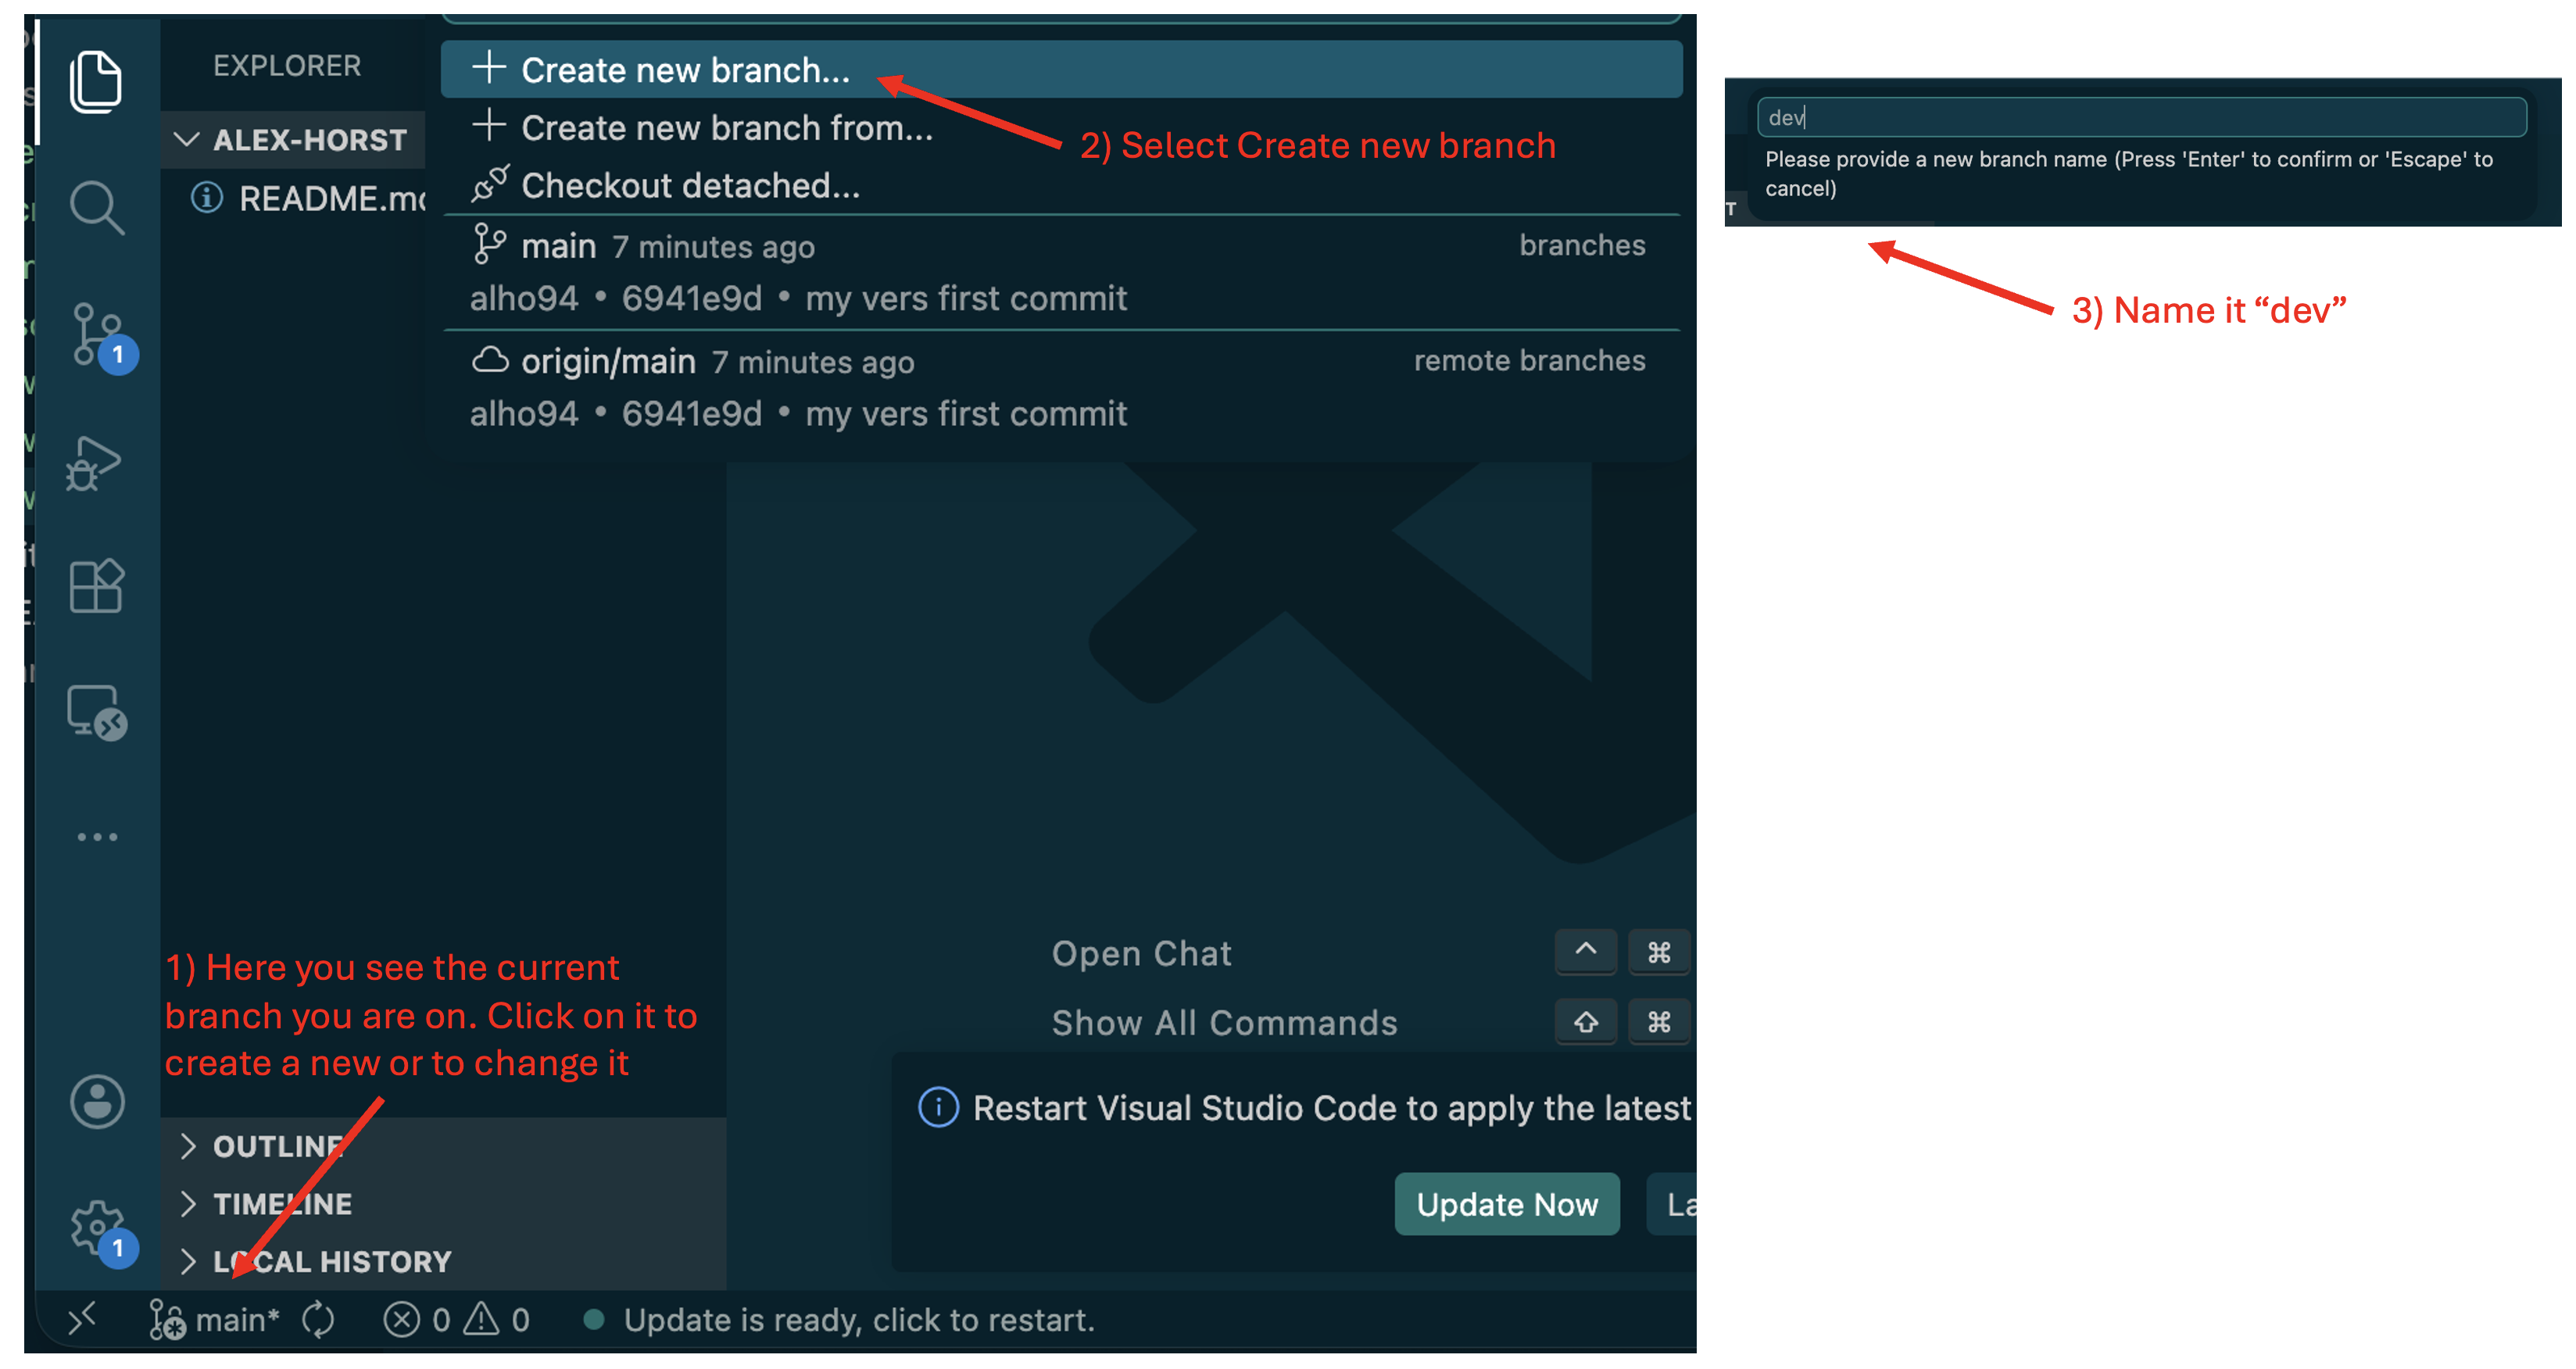
~/Documents/alex-horst). Go to File → Open Folder, navigate to the newly created folder (e.g.,alex-horst), and click Open. You should see the defaultREADME.mdcreated by the GitLab project template.A branch is an independent copy of your code where you can make changes without affecting the main version. A merge request is how you submit your work — it asks GitLab to bring your changes from
devintomain. By default, Git usually starts you on the branchmain(the default branch in your new repository). In this course, you will do your work on the branchdev. When you are finished, you will submit it by opening a GitLab merge request fromdevintomain. To create/switch todevin VS Code, follow the instructions in the image below.
In VS Code, go to File → New File, add this line:
print("hello world"), then save it ashelloworld.pyinside your project folder (File → Save As). In the file section on the left, you see that thehelloworld.pyfile is appearing in green - which is the VSCode telling you, that you have a new file that was not commited yet. Files, that have been already commited (i.e. the README.md) are appearing normal. Changed files appear in orange and deleted files are appearing in red (not shown).
In VS Code, look at the left sidebar and open the Source Control view (see image below). You should see
helloworld.pylisted as an uncommitted change. To make it appear on GitLab, stage it and commit it using the panel shown in the image below. Then press on the sync button which will, under the hood,git pushyour changes to the remote repository.
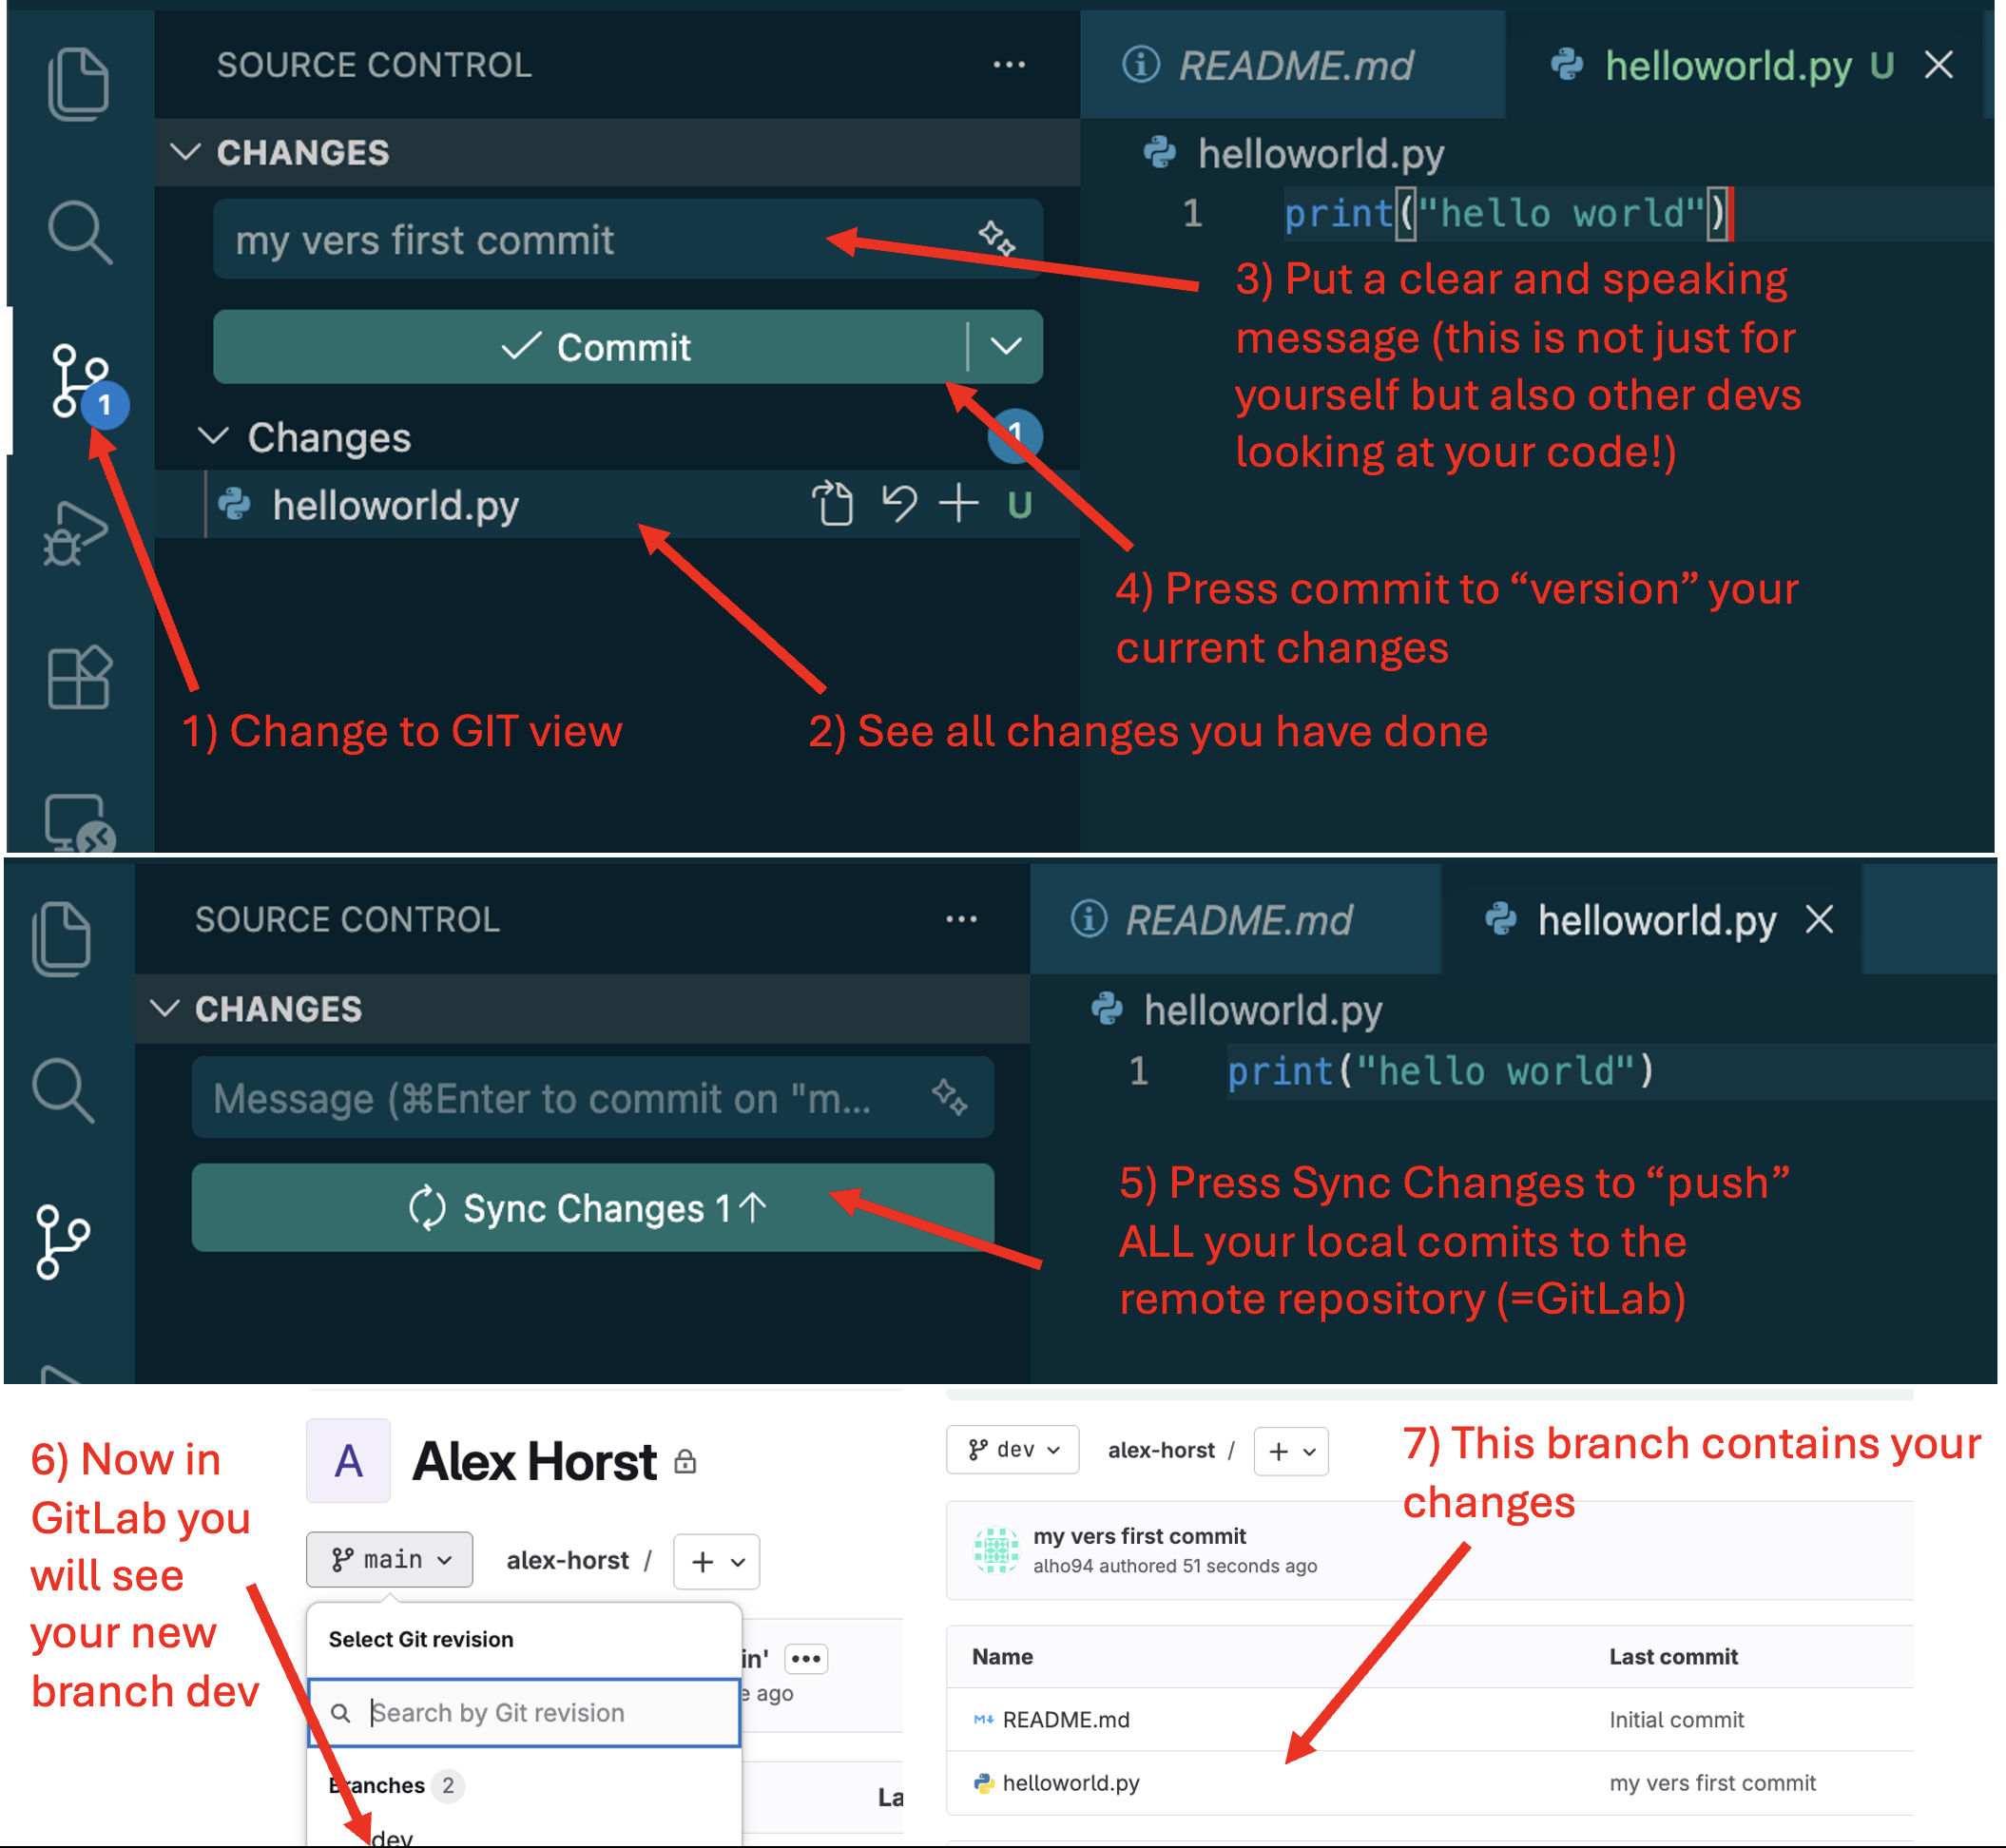
Congratulations—you have now created a new GitLab repository and cloned it to your computer. You can experiment freely, but remember: your work should be on the dev branch, and you will submit it by opening a GitLab merge request into main. To start with, you can find an example submission here.
Summary
| Chapter | Key outcome |
|---|---|
| Why version control? | You understand the problem SVC solves and why Git is the standard tool |
| Git basics | You understand what Git is and what a repository is |
| Repository model | You understand local vs remote repositories |
| Core components | You understand working directory, staging area, and commit history |
| Lifecycle | You can run init/add/commit/push/pull/clone confidently |
| Daily usage | You can follow a clean workflow and maintain .gitignore |
You are now ready for Seminar 1.