Who is this for? Students preparing for Seminar 1.
Goal: Understand what tools we use in this course, why we use them, and complete the minimum setup.
For this course, you need these prerequisites:
Python 3
VS Code
Python + Jupyter extensions in VS Code
A project virtual environment (
venv)
1) Python
Python is the core language used throughout this course for data structures and algorithms.
As of February 2026, the newest stable release line is Python 3.14.x. For this course, any recent Python 3 version is fine (prefer 3.12+).
Why Python matters for this course:
readable syntax → faster learning of algorithmic ideas
huge ecosystem for scientific computing and notebooks
standard in academia and many technical interviews
1.1 Opening a terminal
All commands in this guide are typed into a terminal — a text window where you give instructions to your computer by typing. Here is how to open one:
macOS:
Press Cmd ⌘ + Space to open Spotlight, type Terminal, and press Enter. You can also find it under Applications → Utilities → Terminal.
Windows: Press the Windows key, type Command Prompt, and press Enter.
Once open, you will see a blinking cursor on a line called the prompt. Every time this guide shows a line starting with $ (macOS) or > (Windows), that is a command for you to type and press Enter to run.
1.2 Install Python
Use the official download page:
https://
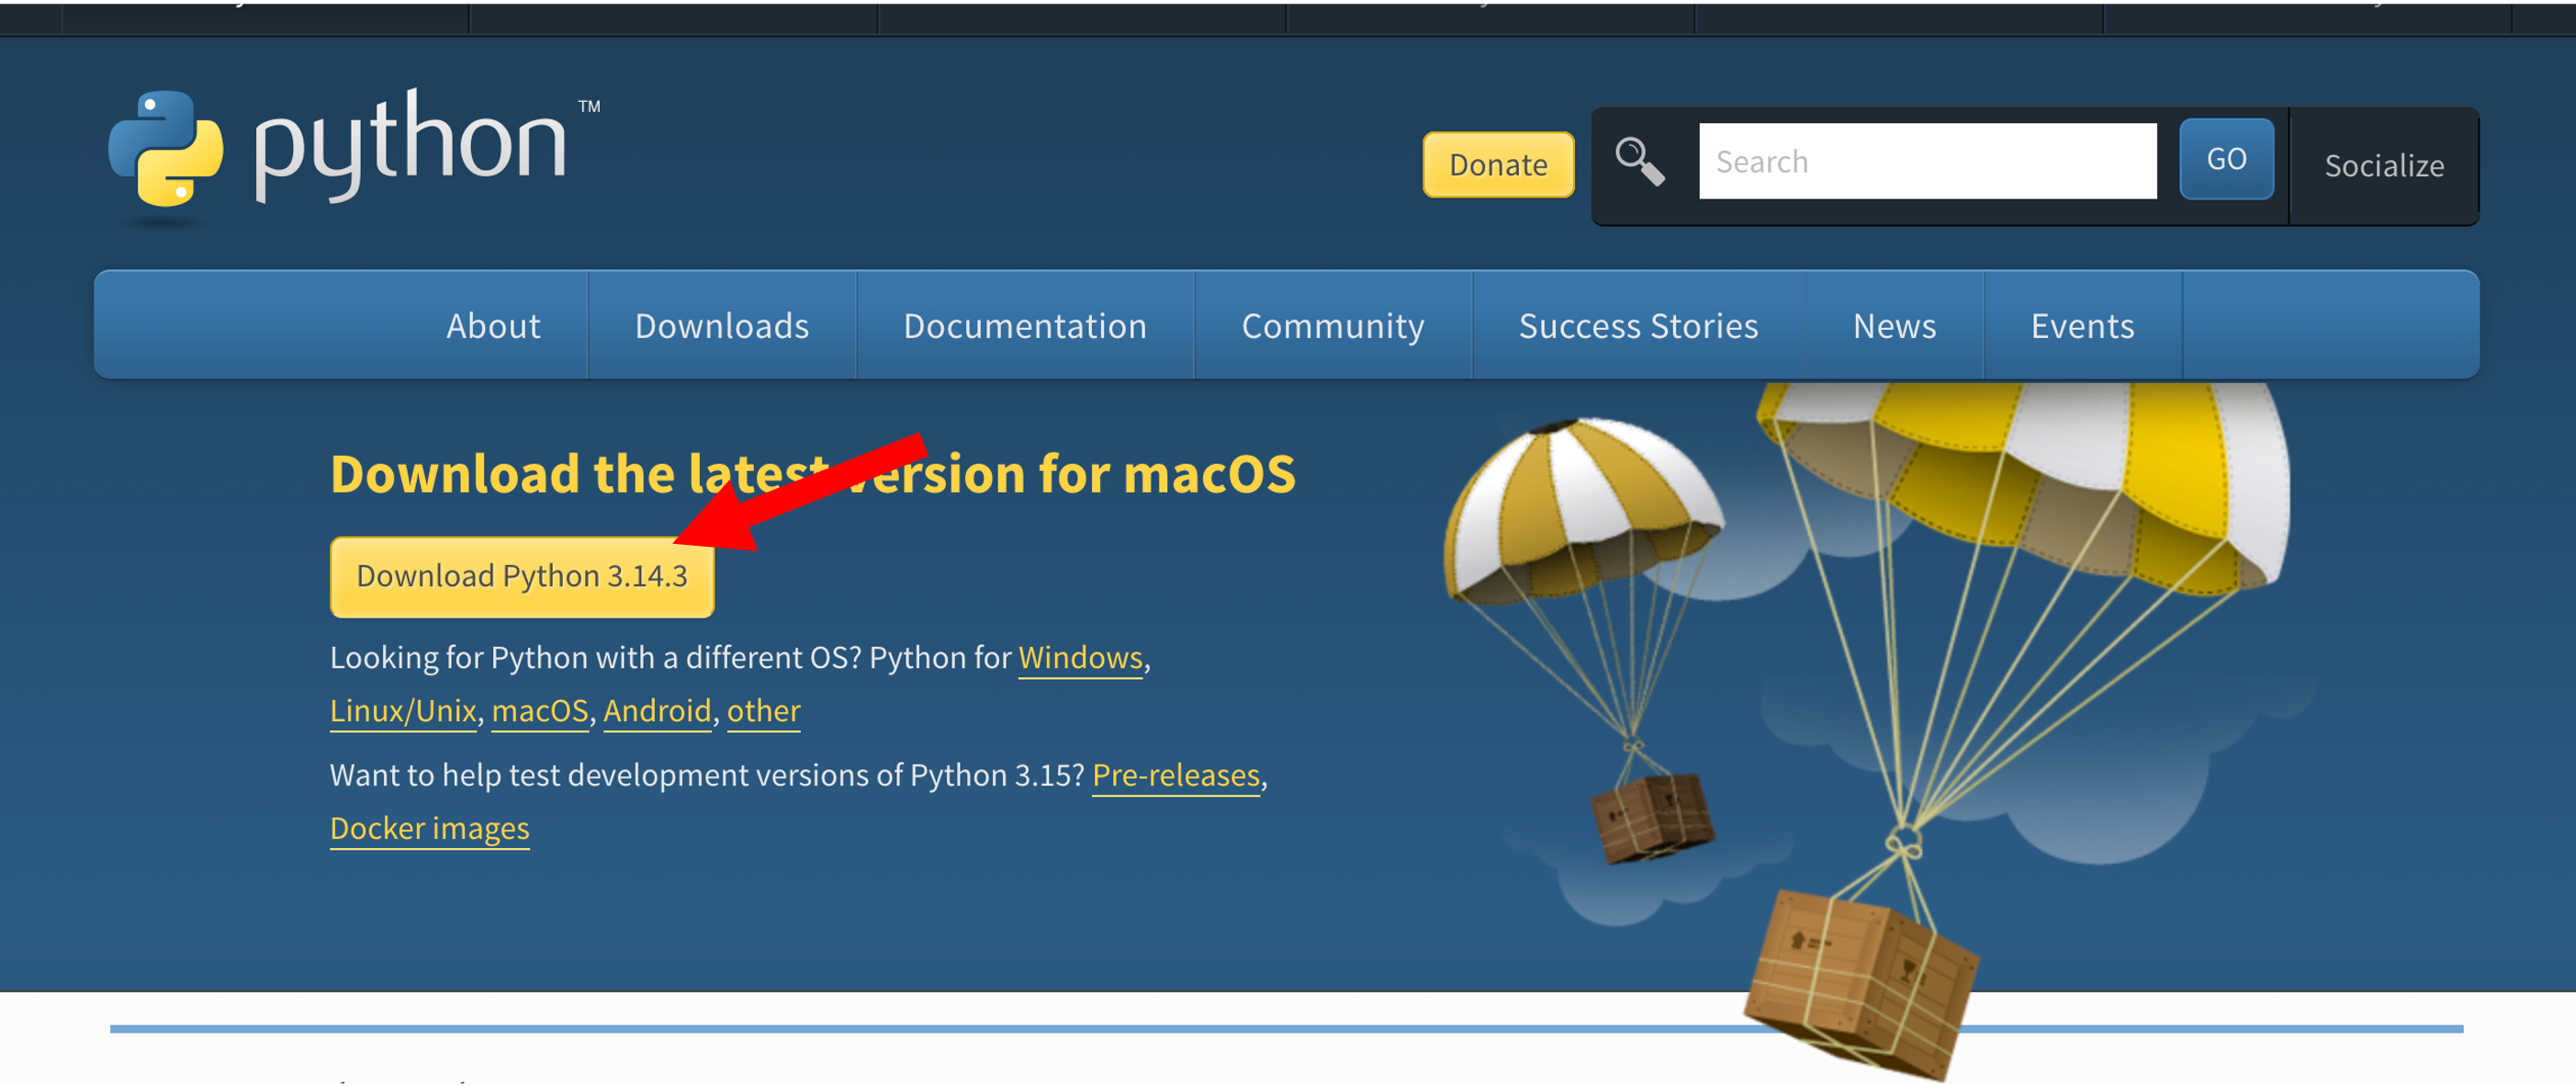
Windows installer tip: when the installer window opens, check the box “Add Python to PATH” before clicking Install. Missing this step is the most common reason Python commands are not recognised in the terminal later.
1.3 Minimal verification
Open a terminal and run the following commands. Pick the block that matches your operating system.
macOS / Linux:
# move to your working folder (creates it if it doesn't exist)
cd ~/Documents
mkdir -p algo
cd algo

# verify Python is installed
python3 --version
Windows (Command Prompt):
REM move to your working folder
cd "%USERPROFILE%\Documents"
mkdir algo
cd algo

REM verify Python is installed
python --version
You should see output similar to:
Python 3.12.4If you see command not found (macOS) or 'python' is not recognized (Windows), Python was not installed correctly — re-run the installer from step 1.1 and make sure to tick Add Python to PATH.
1.4 Virtual environment
When working on multiple projects, you will often need different packages for each project. If you install everything globally (system-wide), all projects share the same package versions, which can easily lead to dependency conflicts when one project requires a different version than another. The Python solution to this problem is the use of virtual environments (venvs). A virtual environment is an isolated environment created specifically for one project, allowing you to use a specific Python version and install project-specific dependencies without affecting other projects. Within that environment, you can freeze the exact versions of all installed packages to ensure reproducibility and prevent conflicts.
To create and activate a virtual environment, run the commands for your OS:
macOS / Linux:
# create and activate virtual environment
python3 -m venv venv
source venv/bin/activate
Windows (Command Prompt):
python -m venv venv
venv\Scripts\activate.bat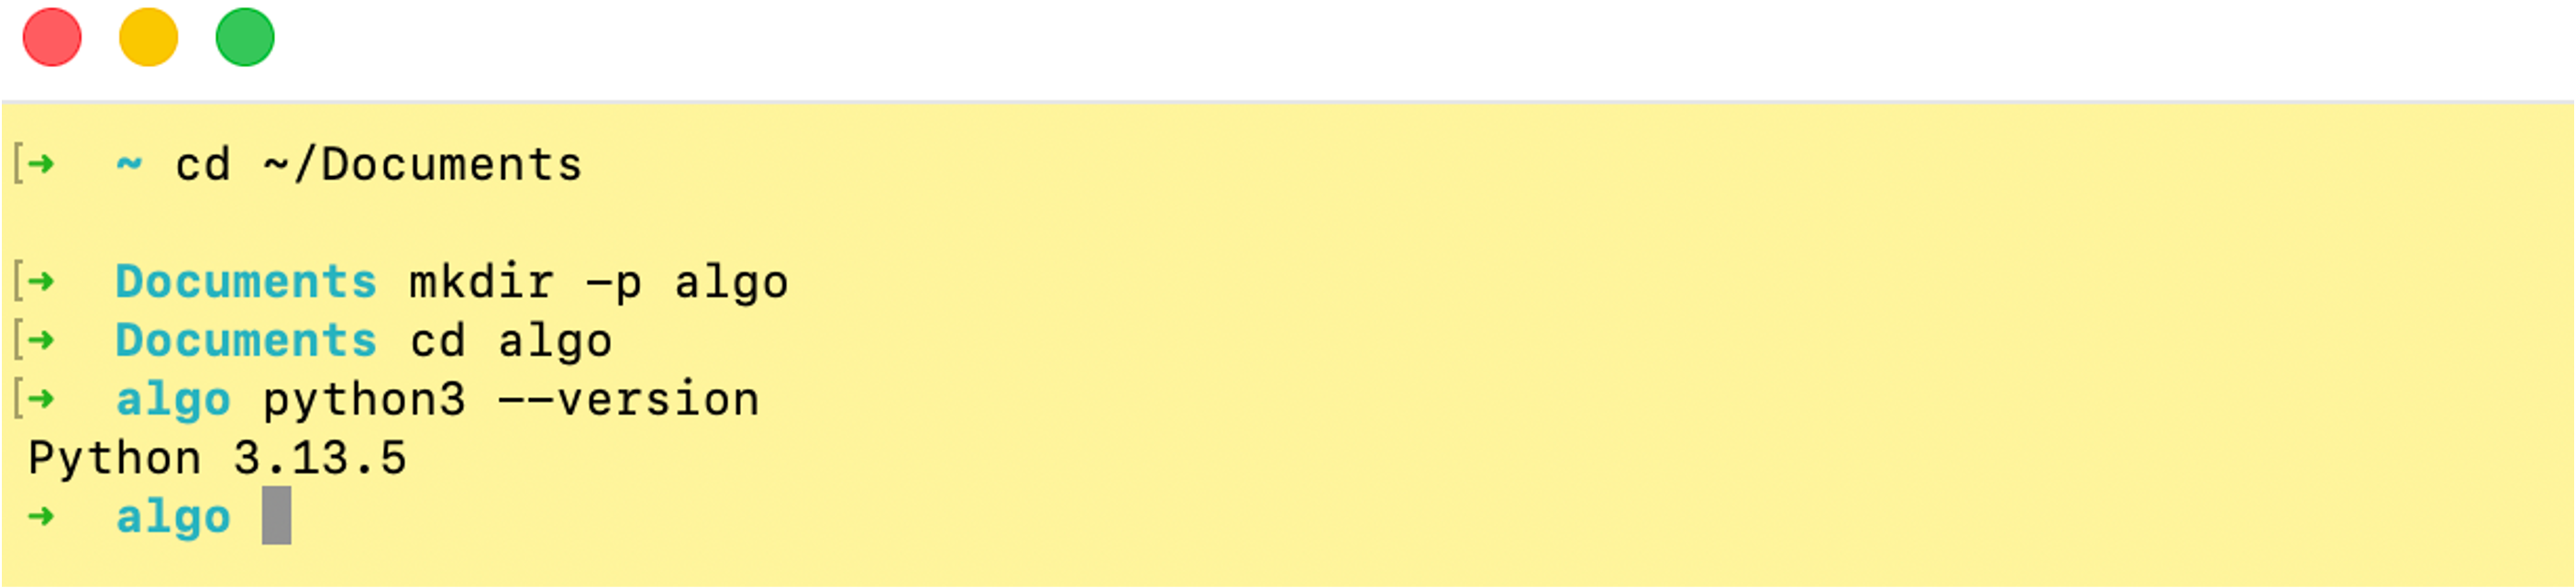
How do you know it worked? After activation, your terminal prompt will start with (venv):
(venv) username@machine algo %           ← macOS
(venv) C:\Users\you\Documents\algo>      ← Windows
This prefix is your visual confirmation that the virtual environment is active. Any python or pip command now uses the isolated environment, not the system-wide Python.
Verify the activated environment:
python --version    # should show 3.12.x (no '3' suffix needed while venv is active)
pip --version       # should show pip XX.X from .../venv/...
When you are done working for the day, deactivate the environment:
deactivateNext time you open a terminal, cd back into the algo folder and reactivate before doing any work.
Key concepts:
python3 -m venv venv: tells Python to run its built-in environment tool (venv) and create a new folder namedvenvcontaining an isolated Python interpreter +pip. We create one virtual environment per project so package versions from different projects do not conflict with each other.after activation, use
pythonandpipnormally becausevenvis first on yourPATH.>>>means you are in the interactive Python shell (REPL). You can type single Python expressions and see results immediately. Typeexit()to leave it and return to the normal terminal prompt.
2) VS Code
VS Code is one of the most used IDEs. IDE means Integrated Development Environment. An IDE combines common developer tools in one place:
code editor
terminal
debugger
project/file explorer
extensions for language support
Why we use VS Code in this course:
free and cross-platform (supports most programming languages)
excellent Python + Jupyter support
same workflow on macOS, Windows, and Linux
Instead of maintaining custom installation steps here, use the official VS Code setup guide:
https://
After installing VS Code, do the following to open your project:
Launch VS Code.
Select File → Open Folder (on macOS this is File → Open...) and navigate to the
algofolder you created in step 1.Your project files will appear in the left Explorer panel (the file tree on the left side of the window).
If VS Code shows a popup “Do you trust the authors of the files in this folder?”, click Yes, I trust the authors — you created this folder yourself.
3) VS Code + Python (Extensions)
VS Code is powerful because most language-specific features come from extensions.
For Python work, you need at least:
Python extension (Microsoft)
Jupyter extension (for
.ipynbnotebooks)
What these enable:
interpreter selection (
venvvs system Python)run/debug Python files
notebook kernel selection and execution
richer linting/intellisense workflows
Use the official tutorial for the exact setup flow:
https://

4) Interpreter Selection (Required)
In VS Code, always set the project interpreter to your venv. This tells VS Code which Python installation to use when running code.
Quick steps:
Open the
algoproject folder in VS Code.Open the command palette (
Cmd/Ctrl + Shift + P).Type and run Python: Select Interpreter.
Choose the interpreter path that contains
venv— it will look something like./venv/bin/python(macOS) or.\venv\Scripts\python.exe(Windows).
Where is the status bar? It is the thin horizontal bar running along the very bottom edge of the VS Code window. After selecting the interpreter, the bottom-left area will show something like:
Python 3.12.4 ('venv': venv)If it still shows a system path (e.g. /usr/bin/python3) without venv in it, the wrong interpreter is selected — repeat the steps above.
Why does this matter? If VS Code uses the wrong Python, it will not find the packages you installed in your
venv, and you will see import errors when running code.
5) Install Course Packages
As discussed in step 1, we now have Python virtual environments set up. For some usecases (i.e. generating figures, data wrangling etc.) we will rely on packages developed by other contributors. Python includes a built-in package management tool called pip, which allows you to easily install external packages using the command pip install followed by the package name. To do so, with your venv activated, run:
pip install --upgrade pip
pip install jupyter matplotlib numpy pandas ipywidgets
To see the installed versions use the following command:
pip freezeThese can be stored in a requirements file, typically called requirements.txt. On another machine:
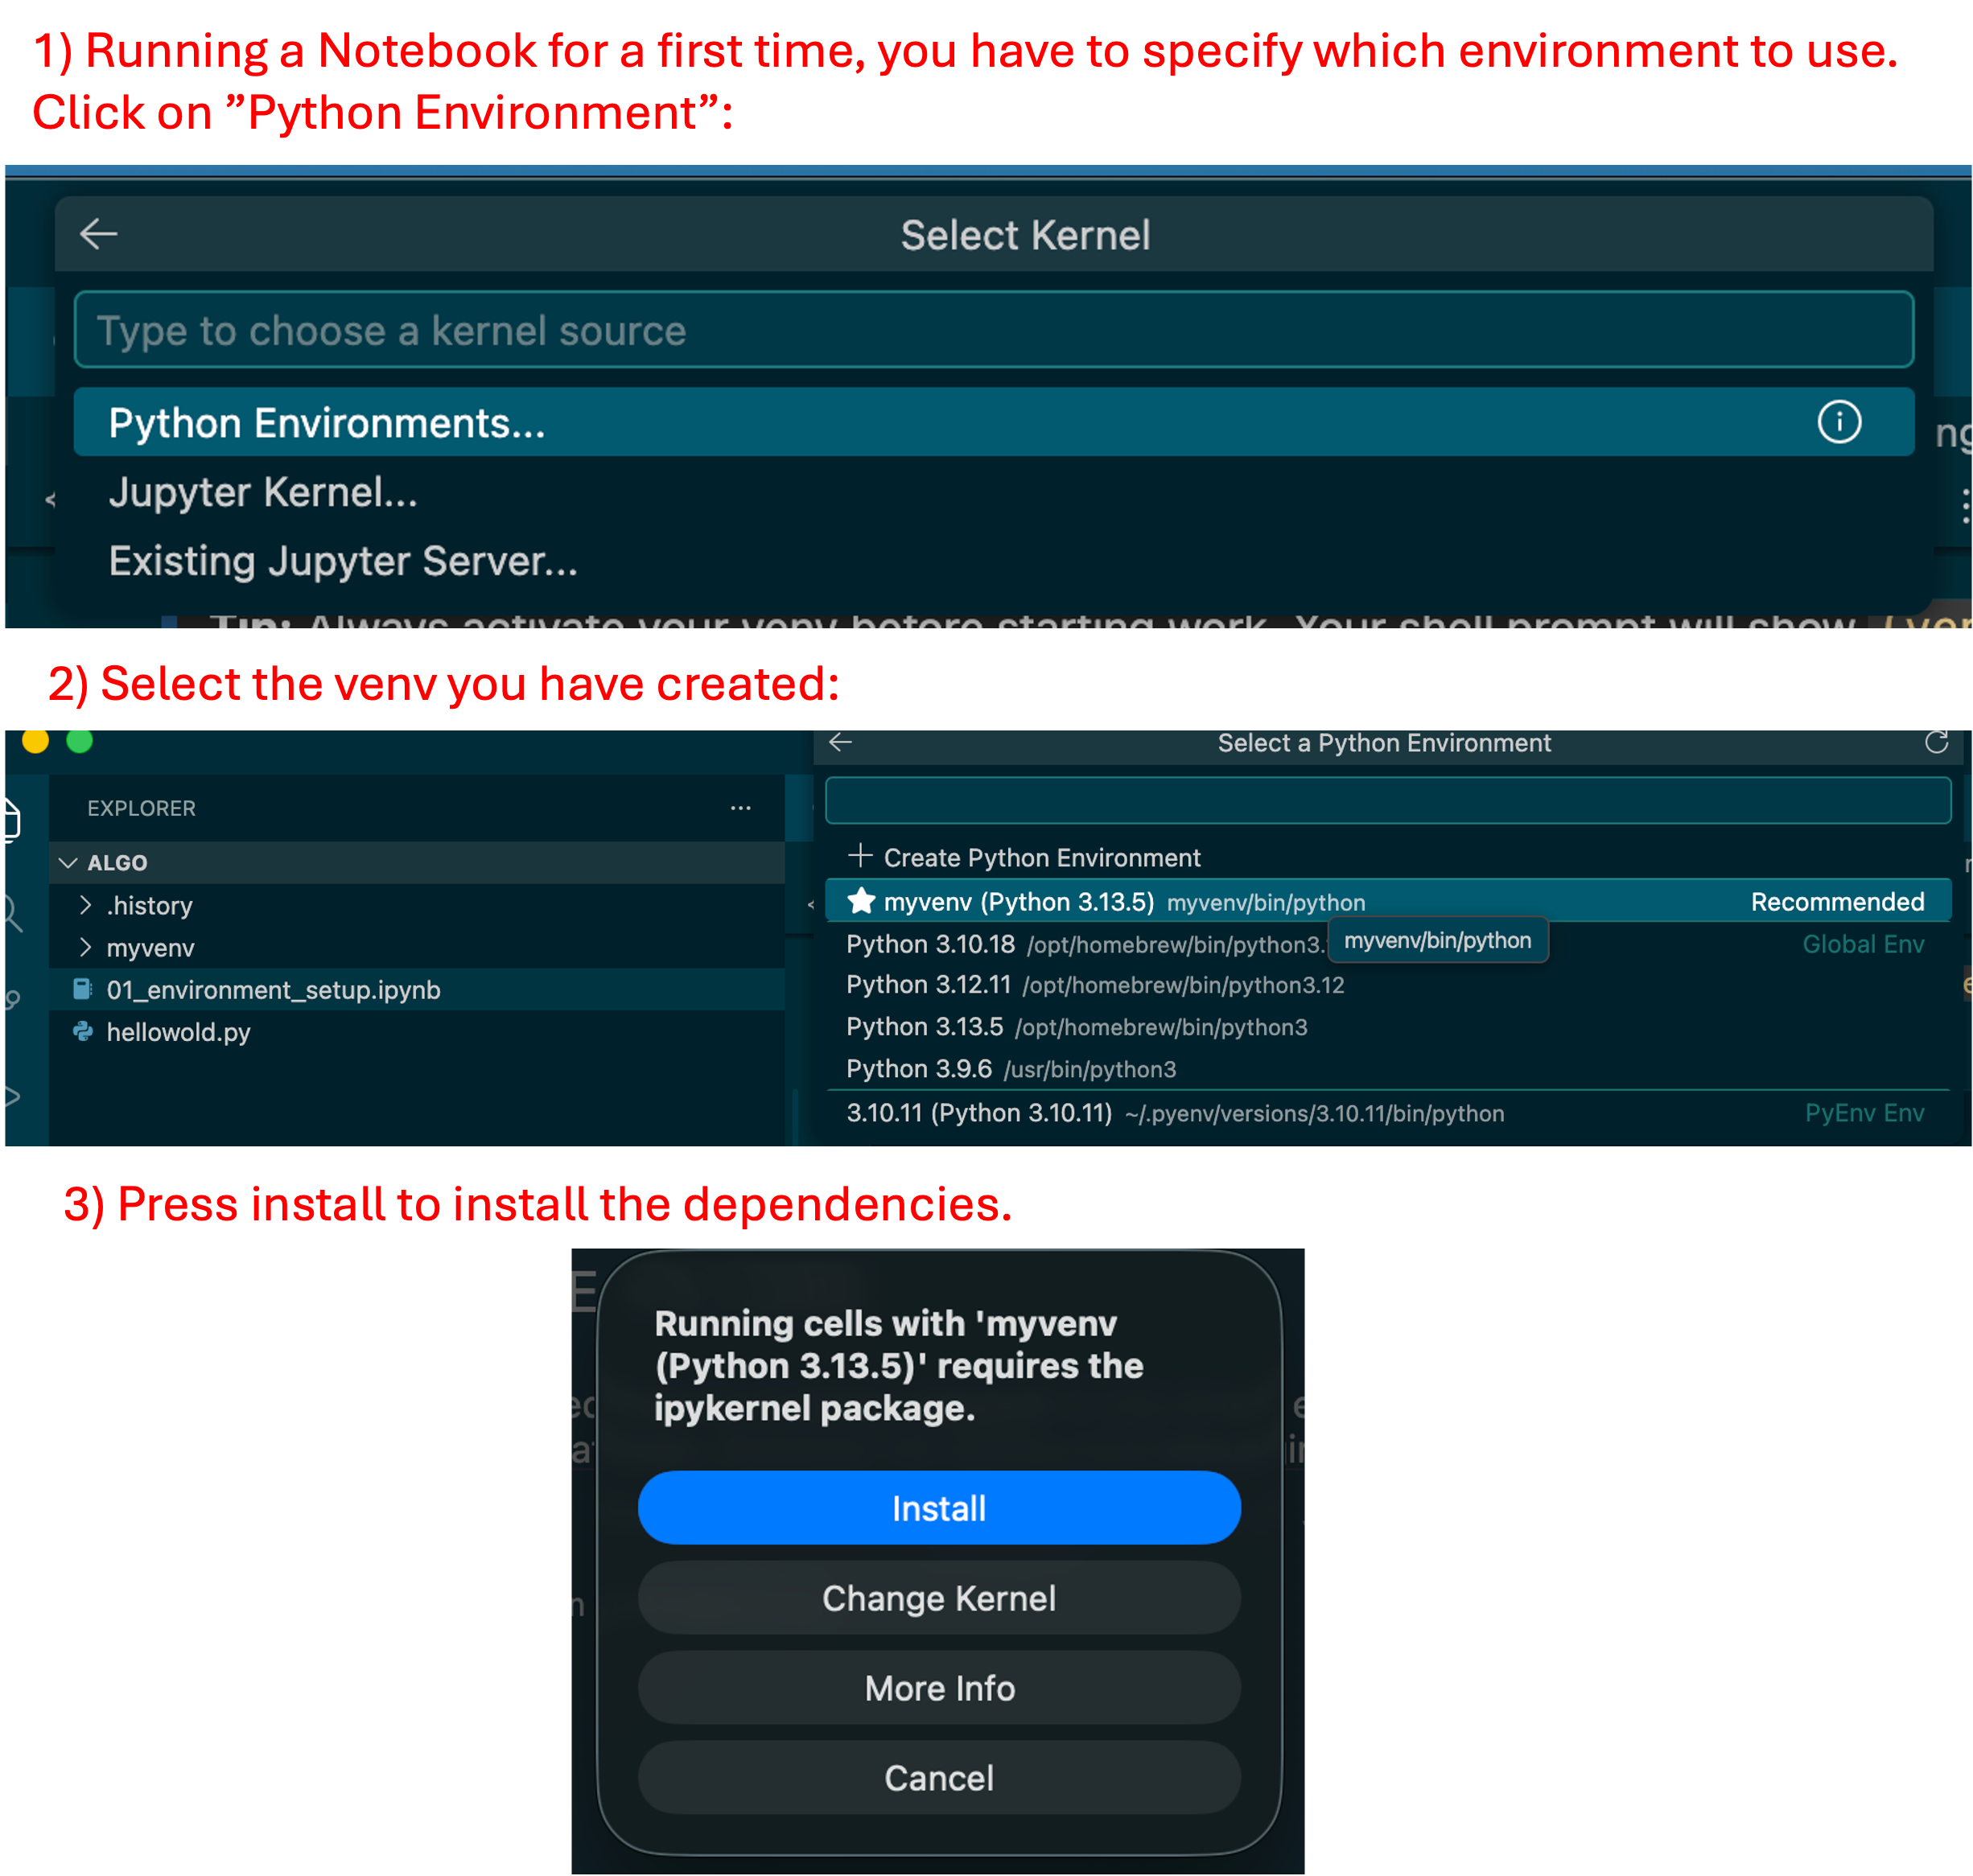
pip install -r requirements.txt6) Jupyter Notebook Check
Download from the course side and open 01_python_basics.ipynb in VS Code and confirm:
notebook opens in editor
top-right kernel points to your
venvcells run with
Shift+Enter
If kernel is wrong: click kernel name -> Select Another Kernel -> Python Environments -> choose venv.
Summary
| Chapter | Outcome |
|---|---|
| Python | You understand Python’s role and prepared a local venv |
| VS Code | You know what an IDE is and where to install VS Code from official docs |
| VS Code + Python | You enabled Python/Jupyter tooling via extensions and selected the right interpreter |
You are now ready for Seminar 1.
7) Troubleshooting Common Issues
| Problem | Likely cause | Fix |
|---|---|---|
python3: command not found (macOS) | Python not installed or not in PATH | Re-run installer; check /usr/local/bin/python3 exists |
'python' is not recognized (Windows) | PATH not configured | Re-run installer, tick Add Python to PATH |
venv\Scripts\activate.bat is not recognized (Windows) | Not in project folder, or venv not created yet | Run cd %USERPROFILE%\Documents\algo, then python -m venv venv, then venv\Scripts\activate.bat |
| VS Code shows wrong Python version | Wrong interpreter selected | Command palette → Python: Select Interpreter → pick venv |
ModuleNotFoundError when running a notebook | Packages not installed in venv, or wrong kernel | Activate venv, re-run pip install; check kernel in top-right |
| Notebook kernel shows “Python 3” but not your venv | Kernel not linked to venv | Click kernel name (top-right) → Select Another Kernel → Python Environments → venv |
pip install gives permission errors | Not in venv | Activate venv first (source venv/bin/activate on macOS/Linux or venv\Scripts\activate.bat on Windows) then retry |
Still stuck? Ask during the next session or post in the course forum with the exact error message you see — copy-pasting the full error is far more helpful than a description.